Basic Guide to Operating the LBC
LBC User Manual:
- Starting up LBC
- Beginning-of-Night Tasks
- Focus and Collimation
- The Image Gallery contains examples of pupil images with and without aberrations.
- By-Eye Active Optics
- Executing an OB
- Looking at the Data
- Shutting down LBC
- End-of-Night Tasks
- Getting your Data
- Troubleshooting
- Engineering Information (for support staff)
Note: This manual, especially the troubleshooting section, links to various issuetraks. Observers do have an issuetrak account with username observer. Please ask a support astronomer for more details.
Pages External to the User Manual:
- Instrument Issues (list of transient issues that is updated frequently; external to the User Manual)
- By-Eye Active Optics
- ImageGallery (if something looks awry in your image, look here...)
Starting up LBC
The LBC Control system operates within a firefox browser. To bring it up,
- log into obs3 or obs2 with your partner username and password (which you should have received from your partner LBTO contact). The other workstations can be used as well, but obs4 is at the far left of the control room and so is usually not used for observing and obs1 is reserved for the telescope operator. Nonetheless, a second LBC User Interface can be opened on any of these machines for monitoring, just be aware that the instrument should be commanded from only one User Interface at a time.
- open firefox by either clicking the on the browser icon along the top panel or by opening an xterm and typing firefox
- Open the URL http://lbccontrol/ui/main.html (note this link is internal to LBT only). This will open a window like the one below.
This window is usually referred to as the LBC User Interface (UI). The user interface has six displays, one for each of six sets of tasks or information: "House Keeping", "Power Control", "OB Execution", "Log Analyzer" and "Info". Click on the icon above the name of the page you wish to display. The UI comes up with the "House Keeping" page displayed. This has plots of the temperature of the thermal link inside the dewar (should be 170-200 K and can vary with telescope position) and vacuum (should be from 1.e-6 to 2.e-5 mbar). LBC will not start up, and if running will shut down, if the vacuum or temperature readings exceed safe values. Safe values as defined in *channel.conf files are 1.e-3 mbar and 250(R) or 240(B) K
- Switch to the "Power Control" page. To start up LBC follow the three steps below. Note the order, and wait until one step has finished before starting the next. Also insure that the "Use it!" boxes are checked - otherwise nothing will happen.
- Turn on Housekeeping: Status will change from "enabled" (off but ready to be turned on) to "initializing" and finally to "ready" (on) after a few minutes.
- If the temperature is below freezing, click the WarmUp button at the left about 10-30 minutes before turning on other systems, as a rule of thumb, about 2 minutes for every degree below zero should suffice. This turns on the power to the technical and science chip controllers but does not initialize them. When it is cold and the electronics have not been warmed up, the Blue camera may fail to come up and an "application buffer full" error is reported.
- Turn on Other Systems (camera & shutter, filters, rotator, trackers): The
button is along the bottom row. After clicking Turn
On the status of each of the 8 systems (4 per channel/2 channels), will change
from "enabled" to "initializing" and finally to "ready". The rotator and
filters are first to be "ready", then the trackers and finally the camera. Typically it takes about 6 minutes for the trackers and camera to turn on since,
during this step, the controller PCs are rebooted.
If one of the systems ends in an "error" or "warning" state:
- check the Log Analyzer for error messages and
- refer to the troubleshooting section to see what these mean and how to recover. Usually it is necessary to turn off and back on all systems, though for more severe problems a reboot of the CMU (central management unit --- the linux LBC control computer called lbccontrol will be required).
- Connect to LBT: The "Connect LBT" button connects the LBC server to the IIF in order to send commands and receive status information from the Data Dictionary. In normal observing with two LBCs, both the "Right Arm" and "Left Arm" checkboxes should be checked which causes LBC to connect to IIF as "Both". LBC must be authorized by the IIF on each side in order for this connection to succeed. LBC should always be disconnected from IIF before changing instrument authorizations. For cases of monocular LBC observing (forced by telescope failures) where one side is authorized as None, or for cases with mixed instrument observing: only the arm being used by LBC should be checked before pressing "Connect LBT". In this case, LBC connects to IIF as either "Left" or "Right" rather than "Both", and sends the appropriate binocular control commands for making syncronized presets and offsets with another instrument. There is no need to change to a one-sided connection when you are merely playing a monocular OB (using just one camera) during binocular observing (LBC authorized on both sides). This connection to the Instrument Interface (IIF) of the TCS should be nearly instantaneous, but if it is taking a while, even after a 2nd click, see the troubleshooting section.
Executing an OB
- Go to the "OB Execution" Page: To execute an OB, go to the "OB Execution" page. As the image shows, this page is divided into 8 sections. Along the top row, the "OB Operations" control is at the left and "OB Info" is displayed in the upper right; From left to right along the middle row: "OB Progress" is shown at the left, the guiding offsets set to the telescope are shown on the right (rotator guiding is not enabled but RA and DEC offsets will be shown) and the middle section displays weather information Finally along the bottom: the left panel displays telescope information and the right two panels display the status of the blue and red channels.
- Load the OB: To load an OB, click on the "Browse..." button in the "OB Operations" section. Select the OB you wish to run and click the downward pointing arrow to upload it. Or, to create an OB, click on the "Create an OB" button within the same section. A new window will pop up and after you have finished filling in the fields in it, click the downward pointing arrow at the bottom of it to upload it to the OB execution page. This newly created OB will be called "fast". The "Create an OB" functionality is discussed in detail in the OB Preparation page. When the OB is uploaded, the downward pointing arrow in the "OB Operations" section should change from black to grey and the "play", "pause" and "stop" buttons (right-pointing, double vertical dashes, box) should turn from grey to black. The OB name, target name, type and coordinates will be displayed in the "OB Info" section. If the observation should be carried out at the current telescope pointing, then current will be written instead of the coordinates. See the OB Preparation page for information on how to indicate that the current pointing should be used.
- Review Settings:
Before executing the OB, review the settings for Telescope,
Guiding, Channel, Mirror and Scaling.
- A check mark to the left of Telescope indicates that:
- the telescope will preset (slew) to the coordinates in the OB (or remain where it is if the Coords are listed as current),
- even if "Preset LBT" is indicated in OB, the telescope will not slew unless Telescope is checked in user interface
- track the target at the sidereal rate according to the trajectory calculated by PCS and
- the LBC rotator will track (rotate) according to the trajectory calculated by PCS.
- if "Rotator Tracking" is not checked in the OB, but Telescope is checked on the User Interface, the rotator will track
- If Guiding is checked, then guiding offsets (corrections to tracking) measured from the technical chip images will be sent to the telescope and used. Leaving it unchecked will not prevent technical chip images from being taken and offsets computed, only no corrections will be sent to the telescope.
- A check mark to the left of Channel indicates whether to use the Blue, Red or both channels; and
- A check mark to the left of Mirror indicates that the instrument will be able to command adjustments to the primary mirror position (necessary for focusing).
- Insure that the exposure time scaling factor is what you want (defaults to 1.00).
- Executing the OB: To execute the OB, click the play button. First the telescope slews to the desired coordinates, then the mirror is adjusted for focus and collimation. During this time (seconds to a minute or two), the status written below whichever channel was checked will remain "ready". Once the mirror is in position and the filter and rotator are being moved, the status is shown as "preset/read/save". Look at the Log Analyzer page if you wish to find out just what is happening at the time. The OB will run to completion unless the stop or pause buttons are pressed.
- Stopping an OB: Pressing the stop button will interrupt the current exposure or readout and will NOT save it. Pressing play will resume the OB, and retake this exposure. Importing the OB again before pressing play will start the OB from the beginning.
- Pausing an OB: Pressing the pause button will cause the OB to pause after the current exposure finishes. This exposure will be written to disk. When you resume the OB, the next exposure in the sequence will be taken. The exposure time scaling can be adjusted when the OB is paused; this may be helpful when taking flat fields.
- Minimum Exposure Times: The LBC shutter has two blades and is shutter telemetry is good to 0.1 second. Photometry is reliable for exposure times greater than 0.3 seconds.
- OB Duration: The maximum exposure times are determined by sky background counts, but the OB times should be limited to 30 minutes. Focus and collimation need to be checked at about 30-minute intervals.
Looking at the Data
Images from both the science and tracker chips are sent first to the read-only /newdata directory, which is mounted on the observer workstations. From there the data are copied to a UTdate (YYYYMMDD) subdirectory of /Repository, which is also mounted on these workstations and read-only.
Both /newdata and /Repository are NFS-mounted and read-only. Therefore, quick analysis is most efficiently done in a subdirectory of the local directory, /scratch.
Examining your data real-timeThere are several ways to examine your images as they arrive in the newdata:
- The python script RB_Science looks for and displays, in two tiled frames in ds9, the Red and Blue science images as they arrive in /newdata. The full path to the script is /home/lbcobs/supportscripts/Observerscripts/ however the .cshrc is set up so you need only type the script name from an xterm to run it. If the script aborts with an error, or does not display the image, stop it by typing "Control-c" in the launching xterm, and restart it. Exiting the ds9 alone will not stop the script. Once the images are displayed, the IRAF task, imexam, can be used to measure image profiles, contours and statistics, among other things, for both frames.
- There is a second python script, called RB_Tech which displays the 2Blue and 2 Red technical chips in four tiled frames of a second ds9. The Blue guide and Blue AO chips are displayed in the top left and bottom left frames, respectively, while the Red guide and AO chips are displayed on the right. If you wish to run both RB_Science and RB_Tech, start the one which will display the images you want to measure in iraf last, i.e. if you want to run imexam on the science images, run RB_Tech and then RB_Science.
- In the IRAF LBTtools package there are the tasks: qdisp, qlook and mext to display a single image or a list of images. More instructions on using LBTtools follow in the next section.
LBTtools is an IRAF package which contains tasks useful to quick analysis of
data taken at LBT. It should be available from all partner accounts.
Setting up LBTtools:
- At the IRAF prompt, type epar LBTtools and you should see
something like the list below:
(version= LBTtools v0.90: Oct 2010)
(observe= OKuhn) Observer ID
(camera = RedLBC) Specify the camera
(focstat= RFBG) If IRTC, which focal station?
(archive= /Repository/20110326) Path to the archived images
(utdate = 20110326) UT Date of the observations
(CatDir = default) Source catalog directory
(Telside= left) Telescope side for IIF cmds?
(calib = ) Not used
(motd = yes) Type the welcome banner?
(mode = h)
($nargs = 0)
Edit or enter the following lines accordingly:- enter the partner or observer name for observe,
- BlueLBC or RedLBC for camera. Note that some tasks, e.g. allseeing and lbcrangebal can override this setting.
- focstat is not used for LBC and can left unchanged
- for archive, enter the full path to the raw images, usually /newdata for current images or /Repository/YYYYMMDD for images obtained one or more nights before
- enter the date as YYYYMMDD for utdate, and
- the CatDir and Telside are not used for LBC tasks and can remain unchanged.
- the calib directory is not used, and can remain blank
- Run the task to effect these changes by exiting with :go or by exiting as usual and typing LBTtools.
- Next, change directory into one into which you can write. Creating a subdirectory under /scratch is recommended. (Note that the /scratch directories are local to each machine; obs2@/scratch/YYYYMMDD is not visible from obs3, for example. The tasks will run faster from /scratch.
- Type prepdir in this directory to create some directories which LBTtools tasks will use.
- qdisp --- display an image given the timestamp as an argument
- In the Observe package you will find the following tasks:
- lbcrangebal --- corrects pointing and copointing (when using both LBCB and LBCR)
- ptautoadjust --- corrects pointing (when using only one LBC)
- In the LBC package you will find the following tasks:
- allseeing --- end of night image quality monitor
- iqplot --- plots FWHM, ellipticity, theta as a function of position in focal plane
- foclist --- for use by support staff to generate lists of focus images
- rotcenter --- for use by support staff to measure the rotator center
- In the Sandbox package you will find the following tasks, which may be run outside of the LBTtools environment:
- qlook --- uses mscdisp to display a multiextension FITS file or the chip indicated by the parameter imext. Can read list input and wildcards to display a series of images, and prompts the user before displaying the next image.
- mext --- like qlook but does not prompt the user and displays only one chip or a single FITS file. With the imext=0 flag for a single FITS file, this is useful to display a "movie" of tech chip images.
Beginning-of-Night Tasks
The telescope should be handed over to the night crew 2 hours before sunset. The operator and instrument support personnel will fill the LBC cryostats and will conduct a safety inspection to insure the telescope and instruments are ready. Once these are completed, the observers are ready to obtain calibrations: typically a set of biases well before twilight and then twilight flat fields. The OBs to obtain these are included in the Calib_OBs.tar package; although each partner should have a set of these already in their account.- Biases:
With the telescope stationary and the dome lights off, take a set of about 25 biases. The bias levels are approximately (end of 2012A):
- Red: chip 1/2/3/4 ~ 515/515/520/500
- Blue: chip 1/2/3/4 ~ 500/485/485/490
- Twilight flats:
To flat field data, twilight and superflats (median-combined science exposures) may be used. There is a gradient on twilight flats, hence there is the option to set up flat field OBs at any position angle.
Twilight flats are usually taken with the telescope tracking near zenith and using an OB which will dither to five positions. About 15-20 minutes after sunset or before sunrise (sun about 6 degrees below the horizon) is a good time to begin checking the counts, and, while relative scalings are still being worked out, in general, flats through the U (U-Bessel and SDT_Uspec) and Y-FAN filters should be done first, while those through the I (I-Bessel and i-SLOAN) and g-SLOAN filters should be done last.
The perl script mkskyflat1.1.pl will create a binocular OB to take a series of 5 dithered exposures about a specific or "standard" position and a binocular "FlatTest" OB. The script and associated files, including a README file, can be downloaded as a tar file, Mkskyflat1.1.tar. Note the version number. Corrections were made on 1 Jan 2014 to wrap values of RA that, initially, are equivalent to the LST at twilight, but, after some adjustment within the script, may fall outside the range 0-360 deg. These corrections affect the program output when the "e" or "m" option is used and for times of the year when LST at twilight is close to 0 hr or 24 hr, i.e. December/January and July/August.
The "standard" position for twilight flats is at an hour angle, HA ~ -00:30, and declination = 27 degrees, close to the zenith. However, if this coincides with the Galactic plane, or you have a preferred position, you may create the OB with these coordinates. A table of coordinates of 38 blank sky fields for sky flats is available from the ING web site.
The script will attempt to scale the Blue and Red exposure times to yield similar counts in both channels, but this may need to be adjusted. The command line syntax allows flexibility in coordinates and exposure times. Some examples follow:
- ./mkskyflat1.pl e 180 U Y will create a pair of OBs to take flats though the U-BESSEL and Y-FAN filters at an RA = LST at sunset - 30 minutes and declination = 27 degrees, PA = 180 degrees, and using the default exposure time scalings.
- ./mkskyflat1.pl 12 0 0 08 0 0 180 S z 3 1 will create a pair of OBs to take flats though the SDT_Uspec and z-SLOAN filters at an RA = 12:00:00 and DEC = 08 degrees, PA=180 degrees, and using the 3 seconds at SDT_Uspec and 1 second at z-SLOAN.
- ./mkskyflat1.pl m 0 V R 1 1 will create a pair of OBs to take flats though the V-BESSEL and R-BESSEL filters at RA = LST at sunrise - 30 minutes and DEC=27 degrees, PA = 0 degrees, and using the 1 second at V-BESSEL and 1 second at R-BESSEL.
Exposure time (t) scalings can be determined from the set of relative count rates, s: (tB/tR = 10(sB - sR)), for which current best measurements are listed in the table below. (Note s = -1 * log10(counts/sec)). These scaling factors are still being adjusted, but are provided here to show the defaults which are assumed in the script, mkskyflat1.pl, and to serve as a rough guide for calculating exposure times to be entered on the command line, if needed.
Relative twilight count rates (8-April-2011, used in mkskyflat1.pl, but to be checked) LBC-Blue LBC-Red filter S = -log10(cnts/sec) filter S = -log10(cnts/sec) (S)DT_Uspec +0.55 (V)-BESSEL 0.0 (U)-BESSEL +0.60 (R)-BESSEL 0.0 (B)-BESSEL 0.0 (r)-SLOAN 0.0 (V)-BESSEL 0.0 (I)-BESSEL -0.1 (r)-SLOAN 0.0 (i)-SLOAN -0.1 (g)-SLOAN -0.35 (z)-SLOAN 0.0 (Y)-FAN +0.6 (F)970N20 +0.9 As the sky becomes darker, it will be necessary to increase exposure times. Both the Red and Blue channel exposure times can be scaled by a factor which can be entered on the OB Execution page of the LBC User Interface. If you wish to change the scaling factor while the OB is playing, click the pause button and wait until the it is paused (the play button will change from grey to black), type the new scaling factor, and then click play again to resume.
- Correct Telescope Pointing and Co-Pointing:
Once dark enough to see stars, slew to a pointing star to correct the telescope pointing. There is an IRAF task in the LBTtools Observe package, called lbcrangebal, which takes as input the timestamps of the LBC-Blue and Red images and adjusts the elevation and azimuth offsets of the pointing model as well as the blue and red mirror positions.
To correct pointing and co-pointing:
- Verify with the TO that he has checked and/or reset the encoders at AZ=120 EL=90.
- Ask the TO to do a ptreset
- Load a pointing star OB to slew to a pointing star at high elevation (70-80 degrees) or near your target.
- The list of pointing stars is at /home/LBTO/RB_VV_PointingOBs/AllStars10.dat. The columns are: Star Name; RA; DEC; proper motion (RA, arcsec/yr); proper motion (DEC, arcsec/yr); epoch; and the list is in order of increasing RA.
- OBs for all of these pointing stars are in /home/LBTO/RB_VV_PointingOBs/ and the OB name is the same as the star name. These OBs take 1 second integrations on chip 2 in both Blue and Red channels.
- Load and play the OB to slew. But stop the OB before it begins to expose.
- Collimate and focus using dofpia. Although the pupil image of the pointing star itself will most likely be saturated, there may be enough less bright stars in the field for dofpia to analyze.
- Once dofpia has finished, reload the pointing star OB and run it all the way through. Note the timestamps of the LBC-Red and LBC-Blue images.
- Run lbcrangebal:
- In IRAF, run LBTtools and load the Observe package
- type epar lbcrangebal. Enter the timestamps of the blue and red images and then :go to run the task.
- You will be asked to confirm the current CE and CA values with the operator. Usually these are correct. If so, hit 'enter' to accept these.
- The red image will be displayed in a ds9 window. Position the mouse cursor on the star and hit the spacebar.
- The blue image will be displayed in a ds9 window. Position the mouse cursor on the star and hit the spacebar.
- Offsets to the pointing and to the SX and DX mirror positions will be sent to the telescope.
- The basic pointing/co-pointing have been corrected.
Active Optics: Focus and Collimation
At the start of the night, after each slew, and about every 30 minutes while tracking a target, the telescope focus and collimation must be adjusted. This is done by taking and analyzing extra-focal pupil images. At the start of the night, the telescope operator should have "Cleared Active Optics" to remove any residual active optics corrections (this clears both mirror shape and collimation corrections) and added +1000nm of Z11 to SX (Blue). The procedure for focussing and collimating the mirrors follows. Since February 2009, the focus/collimation procedure has been automated through the IDL program "dofpia" which both takes and analyzes the extra-focal pupil images, iterating until convergence has been achieved.
To focus and collimate on a field
- Slew to the field: Load the science OB and then click play and stop to execute the slew but not the integrations. The focus and collimation routine requires pupil images of point sources, so if the target field contains an extended object or many non-stellar objects, slew to a position that is offset from the target for focus and collimation.
- Run dofpia: From and xterm in which IDL is running, type dofpia The routine dofpia does the following:
- Sends a positive low-order spherical (Z11) aberration and a corresponding
focus (Z4) adjustment to both SX and DX to increase the diameter of the inner hole and aid fitting the other aberrations. The default corrections are:
- for SX, Z11 = +600 nm and Z4 = +540 nm
- for DX, Z11 = +500 nm and Z4 = +450 nm
- At the beginning of the night, or for seeing greater than ~1.5", append the keyword, First, to double the value of Z11 that is sent: dofpia, /First
- Loads and runs the OB to obtain extra-focal (-0.8 mm below focus) pupil images, "RB_rVfastextra.ob". This OB takes a 16-sec exposure, using a subregion of chip 2, through the V-BESSEL in LBC-B and through r-SLOAN in LBC-R. If there are clouds or the pupils are otherwise too faint, the exposure time can be doubled via the dofpia keyword, /X2. Stop dofpia with "cntrl-C" (if only the initial Z11 was sent) and then backout or if some reasonable corrections to Z11 were made, stop with "S". Use keywords /RedOnly or /BlueOnly to take the pupil image with only one camera.
- Analyzes the resulting images to compute the Zernike aberration coefficients for defocus (Z4), astigmatism (Z5 and Z6), coma (Z7 and Z8) and spherical (Z11). Basically, the algorithm fits the outer diameter of the pupil for Z4; the diameter of the hole for Z11; the relative position of the hole for Z7 and Z8; and the ellipticity, for Z5 and Z6. Examine the dotted lines drawn around the outer and inner edges of the pupils. If these are way off, you may wish to stop the routine and make manual corrections. Check the Image Gallery and By-Eye Active Optics pages for guidance on the manual corrections that may be needed. (23 March 2009 - need to add example pupils and discussion of Z22)
- If the Zernike coefficients determined are greater than the convergence criteria, go back to step 2 and obtain another set of pupil images. The value of this constraint can be adjusted via the dofpia keywords, RedLimit=value and BlueLimit=value.
- Once convergence is reached on both sides, the mirror is sent final Z11 and corresponding Z4 corrections to return the diameter of the inner hole to its ideal value. While convergence is reached on one side only, extra-focal pupil images continue to be obtained and analyzed for both cameras, but corrections are sent only to the side which has not yet converged.
- Sends a positive low-order spherical (Z11) aberration and a corresponding
focus (Z4) adjustment to both SX and DX to increase the diameter of the inner hole and aid fitting the other aberrations. The default corrections are:
- Two ways of stopping dofpia before it exits:
- cntl-C: Stop and backout initial corrections:
If you stop before any Z11 corrections except for the inital one are made, then re-run dofpia with the /Backout keyword. This will remove the initial Z11 (Z4) sent. Note that you can add the /BlueOnly or /RedOnly keyword to remove the intial Z11 (Z4) from only one side.
- shift-S: Stop after some iterations but before convergence limits reached: To stop dofpia gracefully and make the final Z11 correction, type "S" (capital-S). This may be useful if you think the convergence is good enough even though the limits were not reached.
Shutting Down LBC
To shut down LBC at the end of the night, follow the steps below. Note the order, and wait until one step has finished before starting the next:
- Turn off Other systems: Camera, Filters, Rotator, Trackers status will revert from "Ready" (on) to "Enabled" (off).
- Disconnect from LBT
- Leave Housekeeping on and the temperature/vacuum plots displayed. If the instrument is losing vacuum or it is planned to warm it up, be sure to shut it down properly (the camera controllers must be shut down if the vacuum exceeds > 5 x 10⁻⁴ mbar). LBC should always be powered down cleanly. If the UI or LBC server program crash when the power is on, LBC should be restarted and then powered on/off in the normal fashion.
End-of-Night Tasks
- Run the image quality script allseeing:
The IRAF LBTtools task allseeing automatically computes FWHM for
each image, and scales this to the zenith and for filter (FWswl). It creates an output
file UT.fwhm of the form:
LB> type 20080411.fwhm
###   Seeing data for LBC, UT=20080411
###   Run time: Mon May  5 10:41:26 MST 2008
###   UT(hr)  FWswl   IMAGE CAM  FILT   Texp   AIRM   FWHM  Ellip  Np
       3.189   1.34  031119  B    Vb  300.48  1.166   6.53  0.035  190
       3.287   1.45  031712  B    Vb  300.48  1.169   7.06  0.069  200
       3.388   1.97  032317  B    Vb  300.48  1.172   9.64  0.129  210
       9.805   1.73  094819  B    Us  240.49  1.042   8.55  0.062  109
       9.897   1.87  095348  B    Us  240.48  1.048   9.29  0.135  95
Since it may take hours to complete, you may launch it at the end of the night and go sleep while it is running.Also, to maximize efficiency and allow output files to be written, make sure you run it from a directory local to the workstation (obs2,3,4) to which you have write permission (i.e. not Repository or your /home/PARTNER directory which is NFS mounted to obs2,3,4. Create a subdirectory under /scratch, cd to this directory, run prepdir to create the necessary subdirectories, and run allseeing from this directory.
Step by step instructions:
- login to obs2, obs3 or obs4 with your username/passwd
- start up IRAF
- cd /scratch
and make a subdirectory for your partner name;
cd into this subdir - set up LBTtools
- epar LBTtools and enter the info for:
- UT date,
- partner name,
- directory where data are stored (/Repository/UT_partner after you have run "protect")
- NOTE that "allseeing" ignores the value of the camera parameter and instead uses the value of its own camera parameter, which you should normally set to BOTH
- Then, exit with ":go" to load the package LBTtools
- type prepdir to run this task - this is needed to create subdirectories within /scratch/partner, like the Misc directory which allseeing uses
- epar LBTtools and enter the info for:
- type LBC to enter the LBC package where allseeing task is located
- epar allseeing. The default parameter settings should be OK:
- camera = BOTH
- FWHMini = 2.5
- Timecut = 10s exposure time cut (does not use standards or short exposures)
- monitor = no (this would use irafterm)
- double pass = yes
- imglist = Misc/arch.lis
- type allseeing to launch the task.
Getting your Data
Data FlowThe images first are copied to the windows PCs (located in the upper left treehouse). From there they are copied to the /newdata directory, which is mounted on the observer workstations. On average it takes 6 seconds for images to arrive in /newdata. From /newdata they are copied to /Repository/UTDATE (where UTDATE is in the format YYYYMMDD) and to the archive in Tucson, which is mirrored in Italy and Germany.
On the mountain, images older than one day are removed from /newdata, so observers should access /newdata for current data and /Repository/YYYYMMDD for data from previous nights of their run.Tech chip images and OB files are stored in /newdata for the current night and, for previous nights, in the subdirectories tec and ob of /Repository/YYYYMMDD.
Getting your image files
At the end of the night or run, the images can be copied directly from /Repository/YYYYMMDD to a storage medium: portable hard disk or DVDs. They can also be obtained through the LBT archive by pointing your browser to the URL, lbtarchive.as.arizona.edu, and logging in using the information which you should have received from your LBT partner coordinator.
Back to TopTroubleshooting
When a problem arises, check the "Log Analyzer" for error or warning messages. New notes and status information appear in the Log on timescales of seconds so you may need to select (via the check boxes) only the systems that are related to the error message and deselect the other systems. Click "parse" to refresh the view.
Camera or Trackers
Camera or trackers do not come up: There are several failure modes. These may occur during observing also. Check the log for warning or error messages.
- CCD Controller Error (PCI-A300): LBC occasionally reports a CCD Controller
Error on start-up. In the Log Analyzer you will see:
      2006/12/25 08:29:36.874827 TRACKERS CCD Controller error
      [src/trackers/trackers.c:799] 2006/12/25 08:29:36.921000 TRACKERS
      CCDCTRL "PCI board PCI-A300 not found (or driver not installed)"
      controller error [ccdctrl.c:612]
This means that the CCD controller firmware was unable load into the controller. The normal fix is to power off the camera and start it again. This could also indicate a bad fiber connection between the Windows machine and the controller. This is sometimes seen if the cryostat has recently been remounted. The fiber errors typically come in two flavors:- This one is typical if the transmit/receive fibers to the CCD
controller are swapped or disconnected, but we have seen it on plenty of other
occasions.
2007/09/15 10:20:56.568 TRACKERS CCD Controller error [src/trackers/trackers.c:795] 2007/09/15 10:20:56.569 TRACKERS CCDCTRL "PCI_A300 RX link not work" (code:10) controller error [ccdctrl.c:676] - This one is typical if the fiber pairs have been swapped
between the Science and Tech controllers. It also occurs if there are
other hardware based communication issues with the CCD controllers. See
Issuetrak #839 The communication issues are usually solved by cycling the
camera power.
     2007/09/15 10:42:15.996 TRACKERS CCD Controller error
				    	[src/trackers/trackers.c:795]
     2007/09/15 10:42:16.000 TRACKERS CCDCTRL load LCA+on SPC-A200 error
		    (SPC-A200 status register read fail) [ccdctrl.c:696]
- This one is typical if the transmit/receive fibers to the CCD
controller are swapped or disconnected, but we have seen it on plenty of other
occasions.
- Red Camera does not come up: (RPC error): In late May 2008,
we are having some problems bringing the Red Science camera up. It fails
after many RPC connection attempts. See Issuetrak #1386. This is intermittent and we don't
yet know a sure solution, but try the following:
- run up /home/lbccontrol/testpower (as root on lbccontrol)
- in testpower turn on the power to the Windows PC Power Line for the
Red Science Camera (192.128.0.2:3).
- The program will prompt you to select the IP address of the port. Type "3" to select 192.128.0.2
- Type "3" to select outlet 3, the outlet which refers to the Red Science PC.
- Now in the treehouse, the green light for the RedSci PC should be on and steady. The other PCs for the Red Trackers, Blue Science and Blue Trackers should be unlit. If the green light on the RedSci PC is blinking, press the power button (white button on the left) to reboot. If it is steady, then leave all as is.
- in testpower turn off the power to the Windows PC Power Line for the Red Science Camera.
- Type "s" to switch into "shut-off" mode.
- Type "3" to turn off outlet 3.
- Type "0" to exit from the testpower.
- Now, turn LBC back on. Cross fingers - Note that this series of steps has had to be repeated in the past - it worked on the second try, so it is not a sure-fire solution.
- CCD Communication Error (RPC error): Sometimes an executing OB will
crash with a CCD communication error. See
Issuetrak #380. In the Log Analyzer you will see:
      2006/12/24 02:17:31.462463 CAMERA RPC Client/Host communication
                           failed retval:4 [src/camera/camera.c:1056]
An analogous problem can occur with the Tracker controller. Rebooting the CMU is a cure to the problem, but often stopping/restarting the LBC control system using lbckill.sh/lbcstart.sh accomplishes the same fix without having to reboot the CMU proper. Try this first and then if it doesn't work, reboot the CMU.
LBC spontaneous Shutdowns: Suddenly the status of LBC reverts from "ready" to "enabled". Issuetrak #298 reports one such instance when there was a CCD Controller error. The only thing to do is restart LBC. Do not leave LBC in this state as the Windows machines and CCD Controllers are in an unknown state. Even if you are at the end of the night, LBC should be turned on and back off again. A close relative of this failure is the "hinibit" (inhibit) failure where the LBC safety software shuts down the camera when it fails to read the dewar temperature or vacuum 10 times in a row.
Blue Controller shuts off --- temperature safety limit exceeded: In late-Jan/early-Feb of 2008, there were problems with the Blue camera detector temperature sensor. When this gets a few bad readings, it makes an error that stops the Blue science camera. A power cycle is required to revive it (i.e. TurnOff/TurnOn). See Issue #1128 for details. The LBC software was fixed and the Blue Camera is reporting the correct detector temperature all of the time that the camera is on.
Shutter gets stuck:
If the shutter sticks closed, the images will look like biases --- no
stars visible and counts close to the bias levels.
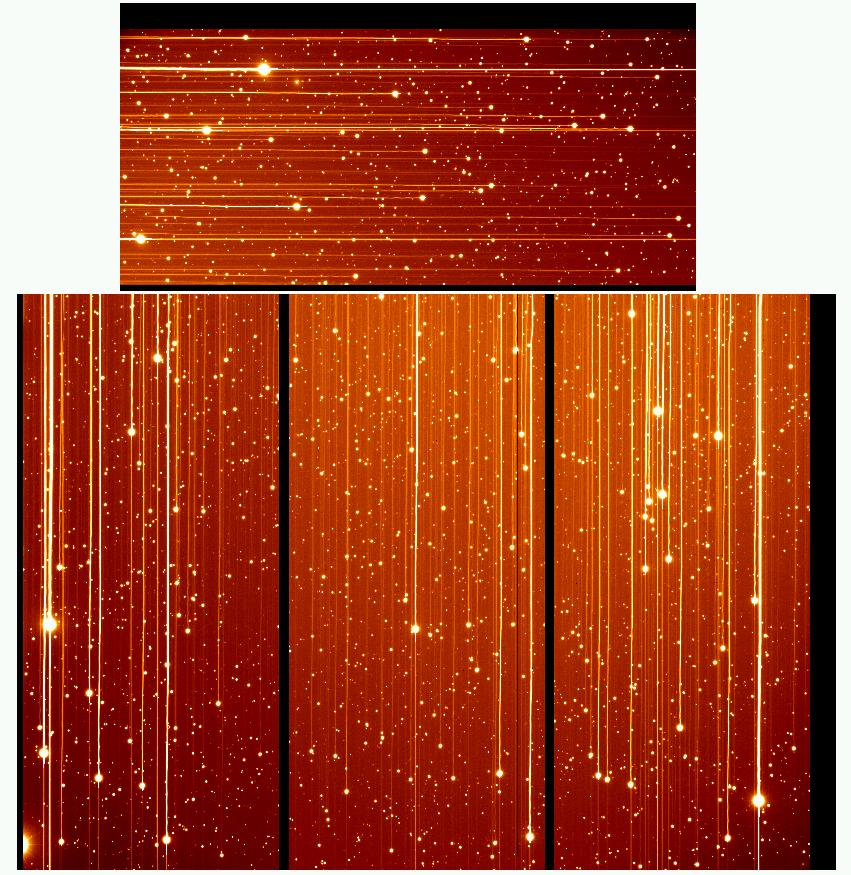
If the shutter sticks open, or partially open, then trails will
be seen, in the +y direction, from all of the stars caused by the
readout clocking. Fainter trails will be seen in the -y direction from
the preflush clocking. (Depending on image scaling, you may only see these
trails for the brightest stars).
The image below was taken with LBC-Red during morning twilight,
when the sky background was high. The image on the left shows a strong right
to left gradient on chips 4 and 2 (chip 3 was out of service at the time).
On the subsequent images, the other blade closed part way, leaving only
a strip of aobut 1000 rows exposed to light, as the image on the right
shows. The trail of a bright star about one-thirds of the way from the
bottom of chip 2 extends in the positive Y direction and makes a kink as
the telescope dithers during the sky flat sequence.
Reinitializing the shutter by power cycling may restore functionality. This may be accomplished, by the observer, by stopping and restarting the LBC, i.e. on the User Interface, turn off and back on "Other Systems", or by the support astronomer through the testpower3 program. Give this a couple of tries, but if it does not help, then the support astronomer may try the low level commands in issuetrak #2532.
If none of these suggestions works, then the Instrument Specialist will need to be contacted, and an inspection of the shutter should be done. The LBC-Blue hub has a shutter toggle switch. This should be positioned to "Auto" for remote operations (control by the User Interface), but can be toggled to move the shutter manually. Try this and listen as the shutter moves. This type of switch does not exist (this needs to be confirmed) on LBC-Red.
Profibus Errors: Profibus is the serial bus protocol used to communicate between the CMU and the various encoders on the rotator and filter wheels in the camera.
- The most common errors produce error messages
in the Log such as the following:
2006/12/25 08:16:43.825447 ROTATOR Encoder problems with profibus
encoder reading [src/rotator/rotator.c:432] 2006/12/25
2006/12/25 08:16:43.815566 FILTERS problems with profibus encoder/s reading
[src/filters/filters.c:514]
The most reliable fix to this problem is to reboot the CMU in order to reset all the serial port parameters. - Another Profibus error is an indication of a hardware
problem. If you get this error, it likely means that the little white
ribbon cable inside the encoder for the filter wheel has come loose. This
sometimes happens during cryostat mounting when the encoder cap has been
moved. The solution is to plug the cable back in and restart the camera.
Rebooting the CMU may be required.
      2007/03/10 03:47:15.355606 FILTERS Profibus board 1 device 10:
      equipment status 33 2007/03/10 03:47:15.355680 FILTERS problems with
      profibus encoder/s reading [src/filters/filters.c:1219]
Filter wheel errors: Occasionally a filter move stops with an error. There are two common problems: check the LogAnalyzer to see the error message.
- Timeout Error on Stop:
These errors usually require turning off/on the camera. The instance reported in (issue #470) was attributed to a loose sensor:
2007/01/28 13:58:37.782936 E B FILTERS WHEEL#2 timeout error on stop
		                        [src/filters/filters.c:2187]
2007/01/28 13:58:37.993040 FILTERS WHEEL#2 hardware failure
                                        [src/filters/filters.c:1099]
We don't know what caused the problem reported in issue #1127 but it was cured by stopping and restarting all systems and housekeeping. - Filter does not reach position after N (N has been set to 20 or higher) attempts:
March and April 2008 observing nights have been plagued by this error which affects Red filter wheel #1,
which contains the Bessel filters, the most. The move is tried a number of times but does not arrive
at the proper position. These failures might be elevation dependent; they seem to occur at 50-60 degrees
elevation. This can often be recovered by simply pressing the Play button to start the OB again.
The errors look like (from #1021):
2008/02/07 03:38:20.738657 N R FILTERS WHEEL#1 motion 20 required a time -0.03 sec longer than expected and reached 18939 abs encoder position 2008/02/07 03:38:22.068703 W R FILTERS WHEEL#1 max attempts number of 20 reached [src/filters/filters.c:2143] 2008/02/07 03:38:22.068779 S R FILTERS WHEEL#1 positioned to 18939 of absolute encoder 2008/02/07 03:38:22.068801 E R FILTERS WHEEL#1 filter is more than 10 times the maximum allowed distance from it nominal position [src/filters/filters.c:2149] 2008/02/07 03:38:22.068864 W R FILTERS WHEEL#1 hardware failure [src/filters/filters.c:1441] - Filters are out of position: If the filters become misaligned,
the illumination pattern will show an arc of a circle, or reflections. Note
that there is some vignetting in the blue camera by the lenses, and this
appears in the corners of chips 1,3 and 4. Two images taken when one of the
blue filter wheels was misaligned are shown below (lbcb.20110106.010836.fits,
left and lbcb.20110106.002557.fits, right). On the image on the right,
strong reflections, possibly
off the filter holder, are superposed on the overall illumination pattern.
The bottom left corner of this image (bottom left of chip 3) shows the
vignetting by the blue camera lenses.
When such misalignment is seen, a support astronomer should be contacted. They will need to determine which filter wheel is causing the problem, and then to edit the values [steps] for Filters.WheelN.FilterNPosition in the configuration file on the LBC computer (CMU), running lbckill.sh and lbcstart.sh to pick up the changes. This table lists the current filter positions for both Blue and Red cameras.
Images appear trailed:
- Rotational trailing: Sometimes the Blue or Red, or both, images show signs of rotational trailing. The stars are elongated into arcs of circles which appear to have a common center. When guiding is working, this center is off to the right of chip 1, on the tech chip used for guiding. The image below shows an example of this rotational trailing.
- The rate of rotation of the LBC derotator may be in error: This rate is equal to the rate of change of the parallactic angle, and this increases towards zenith and towards the meridian. The rate is generated by the TCS-supplied telescope position and the computer time.
- Check that the time on the lbccontrol computer (CMU) and on the windows PCs is correct. Login to the CMU and type ntpdate -q 10.144.0.211 . The delay between the CMU and actual time will be output. Call SW support if this needs to be updated. Ask the support astronomer to log into the Windows PCs (KVM switch instructions are in the LBC Observers' Notebook) to check the times on these.
- Check that the pointing and co-pointing is good. If there is reason to doubt, slew to a nearby pointing star, acquire data and run lbcrangebal to adjust pointing and co-pointing.
- Issuetraks on rotational trailing are: #3346; #3145; #2083; and #2573.
- Uniform trailing or elongation across the field: Uniform elongation across the field of view may arise from errors in telescope tracking, guiding or focus and collimation.
- Telescope "jumps" have sometimes been seen. Usually these leave a non-uniform trail. You can overlay the AZ-EL compass on an image displayed in ds9 using the WCS (File -> "Open Other" -> "Open Mosaic WCS") by selecting "Multiple WCS" -> "WCS a" from the WCS menu. Telescope jumps and tracking errors are likely to be along only one axis. Ask the OSA to check the axis along which the jump or trail occurred.
- Guiding errors may produce elongated images. The guide star on the thumbnail image displayed on the User Interface should appear stable; suspect a guiding problem if the star appears to dance. If you suspect a guiding problem, check:
- the LBC log for message about guiding offsets and for Z2 (P01), Z3 (P02) updates
- the TCS logs
-
Focus and collimation errors:
- How long since the last dofpia run?
- Is there a large difference between the mirror and ambient temperatures?
- Is the temperature changing rapidly?
- Are focus corrections from the tech chip being sent to the TCS?
When rotational trailing is seen in one or both of the images, some things to check are:
LBC User Interface Hangs: This happens sometimes and comes in several flavors. Sometimes the UI browser seems to be hung waiting for the CMU, while other times the UI seems to be refreshing without updating the important parameters related to the present observation. Sometimes things are happening and just not being reported: if the mirrors have stopped moving and the telescope has arrived at position, both of these are reported by the IIFGUI, then start looking for the cause of the hang elsewhere. This problem is documented in Issuetrak #180. More recently, we have seen the UI hang while shutting down after another error has occurred. The system which had the error hangs in the state uninitializing. In this case, it is necessary to run lbckill.sh and lbcstart.sh (Number 5 from the list below). The following actions, which are listed from least to most disruptive of observing, are recommended to restore full functionality:
- Try changing from the OB Execution page to the Power Control page and back. This will not interupt the on-going observation.
- Try simply waiting until the end of the on-going exposure. Often the UI will recover when the image begins to readout.
- Try killing your Firefox browser window on the local workstation and starting a new one. This will not interrupt the on-going observation.
- If LBC loses contact with TCS during a preset, it will wait 5 minutes before timing out. Always wait at least 5 minutes before proceeding to more drastic action. You should also spend the 5 minutes trying to understand why the TCS failed to respond (e.g. there could also be a TCS shared memory problem or other telescope issue).
- Have a root user log into CMU and run the lbckill.sh and lbcstart.sh scripts in /home/lbccontrol/ (see below). This requires going through the full power-up cycle (10 minutes) on the LBC power control webpage. Any observation in progress will be lost.
- Have a root user log into CMU and reboot (see detailed instructions below). This also requires going through the full power-up cycle on the LBC power control webpage.
Main Mirror Fails to Focus: When the temperature gets down to -5 degC, the SX Primary Mirror gets a bit sticky in its hardpoint motions and sometimes fails to meet the position tolerance. When you get the LBC pop-up window that says "Left Main Mirror Fails to Focus", the observer should click "OK" in the LBC pop-up window and allow the OB to continue. Then it should be verfied on the PSF GUI that the mirror is only out of tolerance by 10 microns or so. Compare the "total collimation" X Y Z with the "platform position" X Y Z. (remember that X Y Z are in millimeters and RX RY RZ are in arcsec) This check is to make sure that you aren't observing with some actual mirror support failure which would give similar symptoms except with position errors of hundreds of microns or more. This problem is documented in Issuetrak #383.
Missing images: There are several reasons an image may be missing from the Repository, lbcarchive or lbtarchive:
- Image does not appear in the LBC archive (lbcarchive) or Repository:
- "too few downloaded pixels" error
The full image may not have been downloaded to the windows PC. This happens when there is little time between
readout of the last image and starting the new one, e.g. in sequences of biases or short exposures without a
change of filter or dither, and it was reported in
issuetrak #375. In these series, a few images may not be saved and there will be errors in the log such as:
 2006/12/21 23:44:48.812000 E B CAMERA   CCDCTRL  too few downloaded pixels
                            (42434560 instead of 42467328) [ccdctrl.c:2168]
Since the upgrade to the new controller firmware in May 2007, it has almost been eliminated. - LBC archive down.
Data do not appear in the Repository and in the log you see warning messages such as the following.
This problem was reported in
Issuetrak #454.
 2007/01/25 01:12:10.159000
           W B CAMERA   CCDCTRL  issuing >tftp -b32768 -o 192.168.0.201
           put lbcb.20070125.005307.fits d:\lbcb.20070125.005307.fits >
           nul 2>&1< upload command failed with retcode:6
Check whether the two LBC archive machines: lbcarchive (lbcdh2) and lbcarchive2 (lbcdh1) are up and running by 'pinging' them (i.e. type ping machine_name). If one or the other is not responding, you may need to reboot it. In the computer room to the right of the operator, the LBC archive machines are on the left and labelled. Press the reset button. Ask the operator or call software or observing support in case of any doubts. After the machine is up and running, the data should be automatically transferred and should appear in the Repository (this may not be instantaneous). If the machine does not come back up, you can still take data, but some LBC configuration files will need to be edited to store the data to the CMU from which you will need to manually transfer them via scp. You should call observer support for help with this; some notes appear in the Engineering Information section below.
- "too few downloaded pixels" error
The full image may not have been downloaded to the windows PC. This happens when there is little time between
readout of the last image and starting the new one, e.g. in sequences of biases or short exposures without a
change of filter or dither, and it was reported in
issuetrak #375. In these series, a few images may not be saved and there will be errors in the log such as:
- Cannot find your data in the LBT archive (lbtarchive.as.arizona.edu):
You know data have been obtained for your project but cannot find these from the LBT
archive interface. There are several things to check:
- Was the OBSERVER keyword set correctly in the OB? Check the values entered in the lbtarchive web interface form. If these all look correct, but the data do not appear, you may have set the OBSERVER value in the OB incorrectly? It should be the name of your partner (inaf, lbtb, az or osurc). Upper and lower case are both accepted. Not infrequently, the value of OBSERVER is left blank or incorrectly entered, in which case the data will not appear to someone logged into the archive interface using their partner login information; someone with administrative privileges will need to login to the archive to retrieve the data for you. For details on how to set up OBs with correct bookkeeping information, see OB Preparation & Data Access.
- missing images from lbtarchive:
Some bugs that are turning up in the archive interface are reported here.
- Search by date: For a single date, this does not work. Instead search for the string 'UTdate' in the filename.
- Missing images: Marco noticed that some images from the INAF run at the beginning of April 2008 were not turning up in the archive when he searched by date and exposure time. Not sure this has been tracked down.
Rebooting the CMU: Before rebooting the CMU, turn off the camera (science and tracker cameras and shutters, rotators, filter wheels, housekeeping) as far as possible. If the camera or interface is in a 'hung' state, then there is nothing that can be done. Though not necessary, it is a good practice to close the user interface also. Then, to reboot the CMU, open an xterm and “ssh" as root into the CMU (lbccontrol): ssh root@lbccontrol , type 'who' to check that there are no remote users and if not, or once they are suitably warned, type "reboot". At this point, the xterm will hang, and once the machine has rebooted, it will return the prompt of the workstation to which you are logged in (e.g. obs3,5 or 4). The reboot will take about 3 minutes. Once the CMU is back up, open the user interface and turn back on the “housekeeping” and “other systems”, and finally “connect LBT”.
Connection to CMU lost?: Sometimes the connection to the CMU is lost. The machine may have crashed or been powered off. Ask the operator or instrument scientist (call the support astronomer if you need assistance) to go into the treehouse to press the reset button on the CMU.
The commands lbckill.sh, lbcstart.sh and lbcexit.sh:
- Each time LBC control program is started up in the CMU, a pair of daemon processes is started. /home/lbccontrol/lbckill.sh kills the daemon processes and /home/lbccontrol/lbcstart.sh starts them.
- Use lbckill.sh followed by lbcstart.sh when it is necessary to stop the LBC program running on the CMU, but a full reboot of the CMU is not needed, e.g. if you want to switch to the engineering software or stop and restart the software after a modification.
- lbcexit.sh is a softer stop than lbckill. lbcexit.sh was once used to successfully recover from a hung user interface but it is very infrequently used.
Engineering Information (for support staff)
- Filter Positions
- Making New Collimation Models
- Filter Focus Offsets
- Guiding Parameters
- Directions of Dither Offsets
- Rotator Centers
- Rotator Velocity Scale
- Reconfiguring LBC to store data locally
- Collecting Pointing Model Data
Filter Positions (Dec-2012)
| Blue Filter Wheel Positions (2011 January) | |||||
|---|---|---|---|---|---|
| Wheel #1 | Wheel #2 | ||||
| position | steps | name | position | steps | name |
| 1 | 9676 | 1 | 15200 | ||
| 2 | 32204 | U-BESSEL | 2 | 37728 | r-SLOAN |
| 3 | 54732 | V-BESSEL | 3 | 60256 | empty |
| 4 | 77260 | SDT_Uspec | 4 | 82784 | (was pinhole) |
| 5 | 99788 | B-BESSEL | 5 | 105312 | g-SLOAN |
| Red Filter Wheel Positions (2012 December) | |||||
|---|---|---|---|---|---|
| Wheel #1 | Wheel #2 | ||||
| position | steps | name | position | steps | name |
| 1 | 71931 | 1 | 8825 | ||
| 2 | 98282 | V-BESSEL | 2 | 35469 | r-SLOAN |
| 3 | 124633 | I-BESSEL | 3 | 61952 | i-SLOAN |
| 4 | 19229 | R-BESSEL | 4 | 88271 | F972N20 |
| 5 | 45580 | Y-FAN | 5 | 114848 | z-SLOAN |
Back to top of the Engineering Information Section
Making new Collimation Models for the LBCs
Periodically, the Collimation Models for the LBC need to be updated. Ideally this should be done once a month - during the technical nights which precede an LBC run and after changes to the LBC hub (moving L2 or moving the entire hub as is done twice a year because of seasonal temperature variations in the telescope and swing arm structure).
Data for the collimation model should be obtained in conditions of good seeing (less than ~1"). The procedure for making a collimation model is basically (1) to collimate (run dofpia on star fields at a number of different elevations), (2) note the final pupil image at which dofpia converged, (3) make a list of the mirror position: X,Y,Z,RX,RY; as well as elevation and temperature for each of these final images, (4) run an IDL script to make a quadratic fit to these data and output the coefficients to a file, and (5) copy this file to the telescope.
A step-by-step guide to generating a collimation lookup table follows:
- Ask the operator to "Clear Active Optics" and add Z11 = +1000nm to SX.
- Slew to a star field and run dofpia to focus and collimate. If this is the first focus/collimation of the night, it is best to slew to a moderate elevation. Something along the meridian and with elevation ~70deg would work well. Coordinates need to be given in RA and DEC, but the slew can be done either by the operator or by the observer, through the 'fast OB' interface.
- A cautionary note about mirror travel limits: Before starting to collect data for the collimation model, insure that the mirror travel limits (+/- 2.6 mm) are not hit at very high (greater than 80 deg) or very low (30-40 deg) elevations. The PSF GUI will display the mirror position in red when a limit is hit. The limits tend to be hit at high/low elevations on cold nights (sub zero?) during which it is not possible to focus and collimate over the entire elevation range using the same set of global or pointing offsets. To move away from an X or Y limit, you must make a coma-free pointing correction . Moving away from a Z limit requires the entire LBC hub to be shifted, which is normally not a nighttime operation. The telescope operator can move away from an X or Y limit via the PSF Arbitrator Control GUI which is brought up by clicking the Arbitrator button on the Left PSF Control GUI. This will change the values for X/RY or Y/RX that are shown under Pointing Offsets in the PSF Primary Mirror Active Optics and Collimation Control. Note these changes since they are needed for the collimation model. The data interpretation will be much easier if you obtain all of the collimation data with the same values for the global offsets and pointing corrections. Therefore, it is behooves you to choose a good compromise set at the beginning.
- Run dofpia at this position.
- Repeat steps 1, 2 and 4 to sample well the range of elevation. Usually I aim to step through the 30-90 degree elevation range in 10 degree increments and to cover the entire range twice, once going up in elevation and once going down.
- Make a list the final pupil images which dofpia reported as collimated and after which it exited.
- Run the task pcollim which will take this list and output a new list of header values for the mirror position (MIRRORX,MIRRORY,MIRRORZ,MIRRORRX,MIRRORRY), telescope elevation (TELALT) and ambient temperature (LBTTEMP). The task must be loaded by task pcollim = /home/okuhn/reduce/pcollim.cl
-
Run the IDL program to fit the table of data values listed in the output of pcollim.
- cd /home/lbcobs/Collimation/new/
- idl
- mkcoll_lbc, "input filename" (where the name of the input file should be in quotes)
- cp Collimation_lbc.dat {SX,DX}PMLBCCollimation_
.dat
- Finally, copy new Collimation table to the telescope account on obs1.
scp {SX,DX}PMLBCCollimation..dat telescope@obs1:/home/telescope/TCS/Configuration/PSF/new/
and then copy it to the working name (i.e. without the date), {SX,DX}PMLBCCollimation.dat - Ask the operator to click the button "Initialize" on the PSF GUI; this will load the new collimation table.
Back to top of the Engineering Information Section
Focus Offsets
On nights of stable sub-arcsecond seeing, we have measured the relative filter focus offsets. First we focus and collimate, then we run an OB which steps the primary mirror by 0.04 mm at 5 positions centered around the best-focus. Usually only chip 2 is needed, but obtaining data with all chips allows a study of focal plane curvature which is useful in optimizing the position of L2.
How to measure filter focus offsets: Ideally these measurements should be done in good seeing (0.7 arcsec) and thermally stable conditions. The procedure should be the following:
- Use the IDL procedure dofpia to focus and collimate.
- Use superfoc OBs to take FOCUS sequences of 7 images separated in focus by 0.060 mm for each filter. These OBs can be found in /home/LBTO/Calib_OBs/SUPERFOC/ (the Calib_OBs.tar package is available at the link).
- Analyze the superfoc sequences:
- run the LBTtools task foclist after the sequence has finished. foclist makes a list of the last n focus images in Repository (or whatever data directory is indicated in LBTtools) that were taken through the specified filter, and appends the designation for the extension which refers to the middle chip, LBCCHIP2. (Note: if foclist is not run immediately after the focus sequences of interest, but after more have been taken, it will select the later images instead of those from the sequence of interest.)
- Check the output of foclist to confirm that the FOCSEQN number is the same for all of the images
- use the IRAF task "starfocus" (the command syntax is displayed as output of foclist) to determine the best focus.
- select stars by positioning the cursor over them and typing "m"
- to quit from the star selection and view the fit result, type "q"
- Note: try to select stars always from the same area of the chip. I usually zoom in to the center or the rotator center of CHIP2 and select about 5-7 stars.
- Iterate steps (1) - (3), re-focussing and re-collimating with 'dofpia' sequences every 20 minutes. Continue until you get consistent results.
- When confident of the focus offset, update the file leftchannelfocus.dat or rightchannelfocus.dat in /home/lbccontrol/conf/ with the new filter focus offsets. Use "vi" or "mc" (Midnight Commander) to edit the files.
- Take short "object" images in each filter to check that the offsets are applied correctly.
- configuration files on lbccontrol: /home/lbccontrol/conf/leftchannelfocus.dat and rightchannelfocus.dat
- the tables below
| Date | offset[mm] made after dofpia completes | |||||
|---|---|---|---|---|---|---|
| V-BESSEL | B-BESSEL | U-BESSEL | SDT_Uspec | r-SLOAN | g-SLOAN | |
| 28-Jan-07 | 0 | 0.05 | 0.32 | - | 0.07 | 0.08 |
| 17-Mar-071 | 0 | 0.072 | 0.32 | 0.4862 | 0.033 | 0.044 |
| 10-Jun-073 | 0 | 0.053 | 0.353 | 0.454 | 0.086 | 0.083 |
| 02-Jun-09 | 0.435 | |||||
| 15-Apr-104 | 0.07 | 0.068 | ||||
| 05-May-105 | 0 | 0.046 | 0.344 | 0.446 | 0.091 | 0.065 |
| 29-Dec-106 | 0.07 | 0.116 | 0.414 | 0.516 | 0.161 | 0.135 |
| 9-Mar-117 | -0.02 | 0.026 | 0.324 | 0.426 | 0.071 | 0.045 |
| 19-Sep-118 | -0.02 | 0.026 | 0.3 | 0.414 | 0.04 | 0.035 |
| 30-Sep-159 | 0.00 | 0.045 | 0.31 | 0.43 | 0.068 | 0.06 |
2. updated to 0.450 on 11-May-07
3. These had the V-zeropoint adjusted on 9-Jun-07. (JMH)
4. First new Blue Focus offsets after the Z22 Zero Point was corrected
5. On the 05-May-2010 technical night, all of the Blue Filter focus offsets were redetermined by M. Pedani and J. Hill. These are with the corrected Z22 Zero Point from April.
6. An +0.07mm offset was added to all filters, based on 3 measurements of the V-BESSEL best-focus after the BlueZ22Zero was changed from 1.6 to 2.3.
7. A -0.09 offset was added to all filters, after the BlueZ22Zero was changed back to 1.6, SphOff changed from 88 to 338, BlueFinalZ11 changed from 400 to -100 and FocusAlphaBlue changed from 78 to 78.5. The TWiki Log for 9 March 2011 provides more information and rationale for these changes to the lbcfpia configuration file.
8. Current offsets as of 13-Oct-2014, which include updates made on 2011-09-19.
9. The use of a different region of chip2 by dofpia occasioned remeasuring focus offsets for at least the reference filters, and for LBCB, for all filters. Updates are based on data taken on 30-Sep-2015.
The focus offsets for the red filters were measured at the beginning of 2008. The most recent values in the configuration file are listed here.
| Date | offset[mm] made after dofpia completes | |||||||||
|---|---|---|---|---|---|---|---|---|---|---|
| V-Bessel | R-Bessel | I-Bessel | r-SLOAN | i-SLOAN | z-SLOAN | Y-FAN | F972N20 | TiO_784 | CN_817 | |
| before 30-Dec-07 | 0.13 | |||||||||
| 31-Dec-07 | 0.121 | 0.181 | 0.141 | |||||||
| 13-Jan-08 | 0.302 | 0.2052 | 0.102 | 0.09 | ||||||
| 04-Mar-08 | 0.0963 | |||||||||
| 09-Feb-08 | 0.024 | |||||||||
| 09-Mar-08 | 0.22 | 0.045 | 0.026 | 0.08 | 0.04 | |||||
| 10-Mar-08 | 0.0 | |||||||||
| 28-May-08 | -0.0082 | 0.0252 | ||||||||
| 30-May-08 | 0.00 | |||||||||
| 21-Jan-09 | 0.2393 | 0.1043 | 0.073 | 0.1613 | 0.0893 | 0.0763 | 0.0813 | 0.223 | ||
| 20-Mar-095 | 0.206 | 0.1297 | 0.0788 | 0.1399 | 0.0810 | 0.0611 | 0.06312 | 0.2213 | ||
| 21-Mar-095 | 0.114 | 0.02215 | ||||||||
| 15&16-Jun-0916 | 0.16 | 0.03 | -0.02 | 0.057 | -0.005 | -0.01 | -0.037 | 0.18 | ||
| 17-Sep-0917 | 0.08 | |||||||||
| 15-Apr-10 | 0.08 | 0.123 | ||||||||
| 05-May-1018 | 0.079 | 0.013 | -0.047 | 0.046 | -0.021 | -0.023 | -0.026 | 0.139 | ||
| 26-Mar-1119 | 0.069 | 0.003 | -0.037 | 0.036 | -0.031 | -0.033 | -0.036 | 0.129 | ||
| 19-Sep-1120 | 0.069 | 0.015 | -0.046 | 0.040 | -0.01 | -0.035 | -0.018 | 0.129 | ||
| 30-Sep-1521 | 0.050 | 0.005 | -0.04 | 0.025 | -0.015 | -0.03 | -0.04 | 0.11 | 0.025 | 0.025 |
2. pretty good fit
3. good fit
4. Measured with reference to the intra-focal best-focus and the extra-intra offset of 0.214mm added.
5. Good seeing and stable. Seeing around 0.5". Nevertheless, there was much scatter in best-focus measurements.
6. Average of 3 measurements: 0.1912,0.1942,0.2189.
7. Two measures at 0.125 limit of OB focus range. Edited OB and got 0.1292, but later in the night got 0.110. 0.129 is consistent with the two previous measuresso used it only and neglected 0.110 measurement.
8. Average of 4 measurements: 0.0627, 0.0886, 0.0880, 0.0726.
9. Average of 2 measurements: 0.01398, 0.01382 (Collimation done in between but the measurements were not separated by large time.)
10. Average of 3 measurements not near limit: 0.1154(near limit), 0.0973, 0.0769, 0.0669.
11. Best focus varied a lot over the chip on both sequences: sequence one results are 0.0739 or 0.0689 and sequence two, 0.0405, 0.0571. Adopt 0.06.
12. Average of two measurements: 0.0590, 0.0679.
13. Average of two measurements: 0.2313, 0.2162.
14. This R-Bessel measurement of 0.1 is closer to the earlier value and last nights' end of night value (0.11, remeasurement gives 0.1),so I restored R-Bessel focus offset in LBC filter focus configuration file to 0.104. Comparing 20-March to 21-Jan results, R-Bessel was the only one that I increased; the rest dropped by a small amount, about 0.02mm. Restoring R-Bessel is more consistent with the general changes from January to March.
15. This z measurement just highlights the scatter we are seeing in z. I do not know the cause; leaving at 0.06
16. These were measured on the nights of 15 and 16 June 2009 after the Z22 zeropoints ({Blue/Red}Z22Zero in the lbcfpia.cfg file) were adjusted.
17. Stars through V-BESSEL with previous focus offset (0.16) were donuts. One measurement on 20090911 gave ~0.10 instead, and a second measurement done on 20090917 gave 0.08. Replaced 0.16 with 0.08 and got well-focussed images.
18. Focus offsets redetermined on 05-May-2010 by M. Pedani and J. Hill.
19. Subtracted 0.01mm from all focus offsets based on r-SLOAN results on 20110309 and one Y-FAN result on 20110326. Mistakenly added 0.01 to I-BESSEL, but images looked good and left as is. Seeing at times was sub-arcsecond butdidn't seem stable enough to warrant further measurements on 20110326.
20. Status as of 2014-Oct-13, which includes updates made on 20110919 for R-BESSEL, I-BESSEL, r-SLOAN, i-SLOAN, z-SLOAN and Y-FAN.
21. Use of a different region of chip 2 by dofpia occasioned remeasuring at least the focus for the reference filters. For these a -0.02mm offset was indicated.For R-BESSEL (4), I-BESSEL (5), i-SLOAN (3) and z-SLOAN (2) there were at least two measurements (actual number is in parenthesis after the filter name), from which focus offsets relative to the reference r-SLOAN could be determined. For the other filters, the -0.02mm offset was applied.
If the Z position of the mirror hits a limit at the extra-focal position, you will need to obtain intra-focal pupils. lbcfpia will recognize these as such and will compute corrections. The corrections that are output for focus (Z4), and coma (Z7 and Z8) can be used as they are, but the sign of the correction for spherical (Z11) is flipped. The corrections for astigmatism are not easily converted. Ask the telescope operator to input the output values for Z4,Z7,Z8 and -Z11. There is also a focus offset that needs to be entered when using an intra-focal pupil image to focus and collimate. For the Red channel, this was estimated to be -0.214mm. This offset can be accounted for either by subtracting 0.214mm from all of the filter focus offsets that were referenced to focus obtained from extra-focal pupils (there are files called rightchannelfocus_intra.dat and rightchannelfocus_extra.dat) or by asking the telescope operator to subtract 0.214 from the default global Z offset for DX.
| Filter | offset (mm) | Date | comments |
|---|---|---|---|
| V-BESSEL | 0.086 | 13-Jan-2008 | quite good |
| R-BESSEL | -0.009 | 13-Jan-2008 | quite good |
| I-BESSEL | -0.118 | 4-Mar-2008 | measured, quite good |
| r-SLOAN | -0.02 | 31-Dec-2007 | rough |
| i-SLOAN | -0.07 | 31-Dec-2007 | rough |
| z-SLOAN | -0.114 | 4-Mar-2008 | measured |
| Y-FAN | -0.142 | 4-Mar-2008 | measured but not good fit |
| Filter | Platescale (arcsec/pixel) |
|---|---|
| V-Bessel | 0.2253 |
| B-Bessel | 0.2253 |
| U-Bessel | 0.2255 |
| r-SLOAN | 0.2254 |
| g-SLOAN | 0.2254 |
| SDT_Uspec | 0.2255 |
Back to top of the Engineering Information Section
Guiding parameters
Guiding parameters are set on the lbccontrol computer (root access only) in the files bluechannel.conf and redchannel.conf. For binocular operation with the Red trackers used to guide the telescope (Red as Master) and the Blue trackers used to determine corrections for the Blue channel (Blue as Slave), the parameters are as follows:
| Parameter | Red | Blue |
|---|---|---|
| TypicalExposureTime | 4 | 8 |
| MaximumExposureTime | 32 | 64 |
| MinimumScientificExposureTime | 24 | 32 |
| LoopStartDelay | 151 | 151 |
| MinGuidingCorrection | 0.01 | 0.1 |
| MaxTrackingErrorPerSec | 0.20 | 0.20 |
| MinimumTrackingStars | 1 | 1 |
| AzTrackingGain | 0.9 | 0.9 |
| ElTrackingGain | 0.9 | 0.9 |
Note that the image taken immediately after this file is edited and saved uses previous values; the changes are made only for the subsequent image and onwards. LBC does not need to be run down and back up to accept changes made to guide.dat. We shortened the TypicalExposureTime to 8sec in late December in order to better fight the problem of the elevation jumps.
The MinimumScientificExposureTime on the science array for which guiding with the technical chips will be activated is a parameter set in the bluechannel.dat file (root access only). This is currently (21-Dec-06) 24 seconds. LBC must be run down and back up to accept changes made to the bluechannel.dat file.
Back to top of the Engineering Information Section
Directions of Dither Offsets
Measured at position angle = 0:Dither offsets in the +X direction move the star image right (+X) on Science chips 1-3, and down (-Y) on Tech chip 1.
Dither offsets in the +Y direction moves the image down (-Y) on Science chips 1-3, and left (-X) on Tech chip 1.
Tech chip 1 is right of science chip 1. Pixels are 13.5 microns, and the blue plate scale is 0.227 arcsec per pixel.
The dither offset onto Tech chip 1 is +860, 0 arcsec from the field center.
Back to top of the Engineering Information Section
Rotator center
| LBC-Blue | ||
|---|---|---|
| X | Y | date |
| 1045.32 | 2949.79 | 2008-03-22 |
| 1024 | 2929 | 2008-09-22 |
| 1030 | 2922 | 2010-01-021 |
| 1032 | 2922 | 2010-04-07 |
| LBC-Red | ||
| X | Y | date |
| 1080.21 | 2891.67 | 2008-03-22 |
| 1080 | 2914 | 2010-04-07 |
Back to top of the Engineering Information Section
Rotator velocity scale
A scale factor in rotator.dat will adjust the rotator velocity relative to the trajectory calculated by PCS. This should be 1.00.Back to top of the Engineering Information Section
Reconfiguring LBC to store data locally rather than transfer images to the archive.
If the LBC archive is down and does not come back up after a reboot, as a last resort, you can take data and store it on the the CMU. You will need to login to the CMU and edit bluechannel.conf and lbc.conf. In bluechannel.conf, look for Camera.Upload.Address and Trackers.Upload.Address. These normally are set to 192.128.0.201 to send data to the LBC archive. To send data instead to the CMU:/images/tftp change the "201" to "1". In lbc.conf, look for UploadAddress? . Again, change the IP address from 192.128.0.201 to 192.128.0.1. Remember to change these back once the LBC archive machine is up and running again!!!
Back to top of the Engineering Information Section
Pointing Model Data
Pre-requisites for collecting LBC pointing model data- Have the operator reset the Az and El encoders before the pointing run.
- You need to have a good collimation lookup table for the primary mirror(s). You do not want to run active optics much in the middle of the pointing data. That could change the pointing, adding to the rms residuals of the model.
- You need to turn on the mount logging on PCS Pointing page. It logs continuously once on, every 2.5 seconds, so all you need to do is turn it off at the end of the night and copy the logfile to somewhere.
- You really only need to save data from chip2. That will also make it easier to download the data to Dave's laptop. The field of view is large enough that we can always do a decent WCS on the available stars. I need at least ~21 well-distributed fields to make a "low-order" pointing model (just mount and tube flexure). Use 10s exposures to make sure there are a couple of valid mount snapshots during the exposure. You can point to anywhere on the sky (it does not have to be on pointing stars), I'll derive the PM for a virtual star on the detector.
Back to top of the Engineering Information Section
Back to Top